Webサイトでよく見かける、テーブルデザイン。
住所録や金額表など、多くの場面で見やすくわかりやすくしてくれる味方です!
テーブルデザインで表になっていると一目でわかるので、文字がずらずら並んでいるよりユーザビリティがアップします!
レスポンシブは必須デザインですが、縦バージョンの表を作成した時に何度もタイトルとデータがうまく表示されない( ;∀;)と焦ったこともありました。それを踏まえて、今回はHTMLとCSSを使用して作るシンプルなレスポンシブに対応した “テーブルデザイン” をご紹介します!
ワードプレスのテーマには、テーブルデザインが組み込まれているものもありますが、スクラッチで組んだ場合や、テーブルデザインの組み込まれていないワードプレスのテーマを使用する際に参考にしてみてください。
“テーブルデザイン” と “文字だけ” どれだけ違う??
初めに、”テーブルデザイン” を使用した場合と文字だけで書いた場合の見やすさの違いを見てみましょう。
《テーブルデザイン》
| 名前 | 猫の種類 | 性別 | 性格 |
| チャッピ | 三毛猫 | メス | おだやか |
| ミスティ | アメリカン ショートヘア | オス | 活発 |
| かりん | ヒマラヤン | メス | のんびりや |
《文字だけ》
チャッピは三毛猫のメスでおだやかな性格です。
ミスティはアメリカンショートヘアのオスで活発です。
かりんはヒマラヤンのメスでのんびりやです。
このように文字だけで表示するより、テーブルデザインを用いて表になっている方が、パッと見てわかりやすくまとめることができます。
“テーブルデザイン” の基本
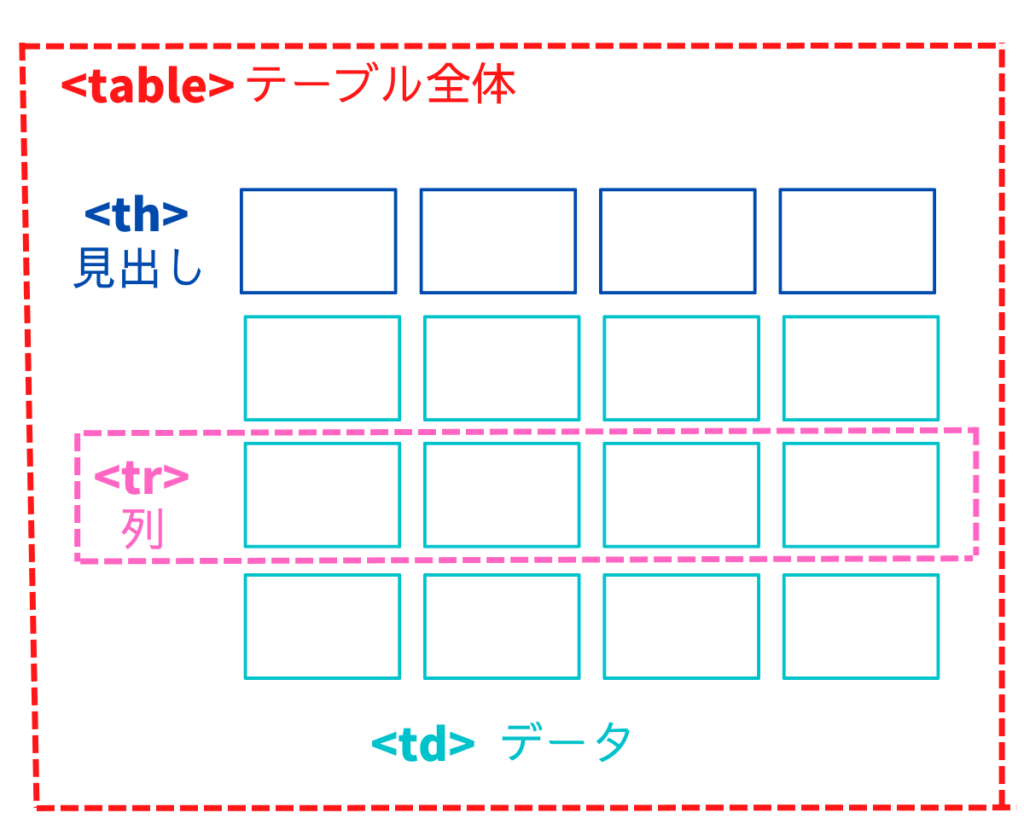
テーブルデザインを作成するときは、HTMLの<table>タグを利用します。

tableタグ
<table> </table> テーブル全体を囲むタグです。
trタグ
<tr> </tr> で挟まれた部分を横列に指定するタグです。
thタグ
<th> </th> 見出しタイトルを入力するタグです。
<tr>タグの中で使用します。
一般的なブラウザでは、中央寄せの太字で表示されます。
見出しが必要ない場合は、省略できます。
tdタグ
<td> </td> 各項目のデータを入力するタグです。
<tr>タグの中で使用します。
左寄せで表示されます。
“テーブルデザイン” を作ってみよう!

早速、テーブルデザインを作ってみよう!コピペでも使えるよ!
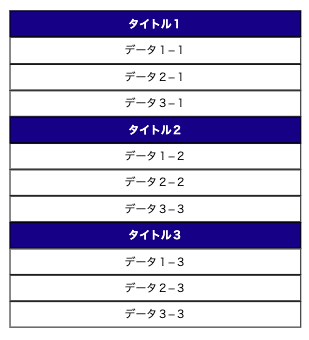
バックカラータイトルのテーブルデザイン(横型)
| タイトル1 | データ1−1 | データ2−1 | データ3−1 |
|---|---|---|---|
| タイトル2 | データ1−2 | データ2−2 | データ3−3 |
| タイトル3 | データ1−3 | データ2−3 | データ3−3 |
[ HTML ]

<table class="table_1">
  <tr>
    <th>タイトル1</th>
    <td>データ1−1</td>
    <td>データ2−1</td>
    <td>データ3−1</td>
  </tr>
  <tr>
    <th>タイトル2</th>
    <td>データ1−2</td>
    <td>データ2−2</td>
    <td>データ3−3</td>
  </tr>
  <tr>
    <th>タイトル3</th>
    <td>データ1−3</td>
    <td>データ2−3</td>
    <td>データ3−3</td>
  </tr>
</table>
[ CSS ]
.table_1 th {
border: solid 1px #000;
background-color: #000080;
color: #ffffff;
}
.table_1 td {
border: solid 1px #000;
background-color: #ffffff;
color: #000;
}
/* レスポンシブ対応 */
@media screen and (max-width: 768px) {
.table_1 th, .table_1 td {
display: block;
}
}

<td>タグと<th>タグに display: block; を設定するとレスポンシブ対応で縦型の表になるよ!

バックカラータイトルのテーブルデザイン(縦型)
| タイトル1 | タイトル2 | タイトル3 | |
|---|---|---|---|
| タイトル1 | データ1−1 | データ2−1 | データ3−1 |
| タイトル2 | データ1−2 | データ2−2 | データ3−3 |
| タイトル3 | データ1−3 | データ2−3 | データ3−3 |
[ HTML ]

<table class="table_2">
  <tr>
    <th class="th-pc">タイトル1</th>
    <th class="th-pc">タイトル2</th>
    <th class="th-pc">タイトル3</th>
  </tr>
  <tr>
    <th class="th-sp">タイトル1</th>
    <td>データ1−1</td>
    <td>データ2−1</td>
    <td>データ3−1</td>
  </tr>
  <tr>
    <th class="th-sp">タイトル2</th>
    <td>データ1−2</td>
    <td>データ2−2</td>
    <td>データ3−3</td>
  </tr>
  <tr>
    <th class="th-sp">タイトル3</th>
    <td>データ1−3</td>
    <td>データ2−3</td>
    <td>データ3−3</td>
  </tr>
</table>
[ CSS ]
.table_2 th {
border: solid 1px #000;
background-color: #dcdcdc;
color: #000;
}
.table_2 td {
border: solid 1px #000;
background-color: #ffffff;
color: #000;
}
.th-pc {
display: none;
}
/* レスポンシブ対応 */
@media screen and (max-width: 768px) {
.th-pc {
display: none;
}
.th-sp {
display: block;
text-align: center;
}
.table_2 td {
display: block;
text-align: center;
}
}
縦型のテーブルの時は、display: block; だけだと表のタイトルが縦並びになってしまうんだ。パソコン用のタイトルとスマホ用のタイトルを表示切り替えすると、タイトルとデータが綺麗に縦並びになるよ!
ダブルラインタイトルのテーブルデザイン(縦形)
| タイトル1 | タイトル2 | タイトル3 | |
|---|---|---|---|
| タイトル1 | データ1−1 | データ2−1 | データ3−1 |
| タイトル2 | データ1−2 | データ2−2 | データ3−3 |
| タイトル3 | データ1−3 | データ2−3 | データ3−3 |
[ HTML ]

<table class="table_3">
  <tr>
    <th class="th-pc">タイトル1</th>
    <th class="th-pc">タイトル2</th>
    <th class="th-pc">タイトル3</th>
  </tr>
  <tr>
    <th class="th-sp">タイトル1</th>
    <td>データ1−1</td>
    <td>データ2−1</td>
    <td>データ3−1</td>
  </tr>
  <tr>
    <th class="th-sp">タイトル2</th>
    <td>データ1−2</td>
    <td>データ2−2</td>
    <td>データ3−3</td>
  </tr>
  <tr>
    <th class="th-sp">タイトル3</th>
    <td>データ1−3</td>
    <td>データ2−3</td>
    <td>データ3−3</td>
  </tr>
</table>
[ CSS ]
.table_3 th {
border: double 5px #000;
background-color: #ffffff;
color: #000;
}
.table_3 td {
border: solid 1px #000;
background-color: #ffffff;
color: #000;
}
.th-pc {
display: none;
}
/* レスポンシブ対応 */
@media screen and (max-width: 768px) {
.th-pc {
display: none;
}
.th-sp {
display: block !important;
text-align: center;
}
.table_3 td {
display: block;
text-align: center;
}
}タイトルが2つあるテーブル
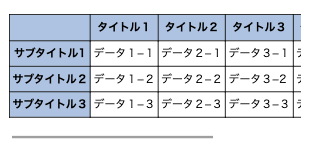
| タイトル1 | タイトル2 | タイトル3 | タイトル4 | タイトル5 | |
|---|---|---|---|---|---|
| サブタイトル1 | データ1−1 | データ2−1 | データ3−1 | データ4−1 | データ5−1 |
| サブタイトル2 | データ1−2 | データ2−2 | データ3−2 | データ4−2 | データ5-2 |
| サブタイトル3 | データ1−3 | データ2−3 | データ3−3 | データ4−3 | データ5-3 |
[ HTML ]

<div class="scroll">
  <table class="table_4 scroll">
    <tr>
      <th></th>
      <th>タイトル1</th>
      <th>タイトル2</th>
      <th>タイトル3</th>
      <th>タイトル4</th>
      <th>タイトル5</th>
    </tr>
    <tr>
      <th>サブタイトル1</th>
      <td>データ1−1</td>
      <td>データ2−1</td>
      <td>データ3−1</td>
      <td>データ4−1</td>
      <td>データ5−1</td>
    </tr>
    <tr>
      <th>サブタイトル2</th>
      <td>データ1−2</td>
      <td>データ2−2</td>
      <td>データ3−2</td>
      <td>データ4−2</td>
      <td>データ5-2</td>
    </tr>
    <tr>
      <th>サブタイトル3</th>
      <td>データ1−3</td>
      <td>データ2−3</td>
      <td>データ3−3</td>
      <td>データ4−3</td>
      <td>データ5-3</td>
    </tr>
  </table>
</div>
[ CSS ]
.table_4 th {
border: solid 1px #000;
background-color: #b0c4de;
color: #000;
}
.table_4 td {
border: solid 1px #000;
background-color: #ffffff;
color: #000;
}
/* レスポンシブ対応 */
@media screen and (max-width: 768px) {
.scroll{
overflow-x : auto;
white-space: nowrap;
}
}

レスポンシブの作り方は、overflow-x: auto; を使って、横スクロールする方法もあるよ!
タイトルが2つある場合や縦に表示させるにはボリュームが大きい場合には、この方法も便利だよ!

バックカラーのタイトルなしテーブルデザイン
| データ1−1 | データ2−1 | データ3−1 |
| データ1−2 | データ2−2 | データ3−3 |
| データ1−3 | データ2−3 | データ3−3 |
[ HTML ]

<table class="table_5">
  <tr class="color-1">
    <td>データ1−1</td>
    <td>データ2−1</td>
    <td>データ3−1</td>
  </tr>
  <tr class="color-2">
    <td>データ1−2</td>
    <td>データ2−2</td>
    <td>データ3−3</td>
  </tr>
  <tr class="color-1">
    <td>データ1−3</td>
    <td>データ2−3</td>
    <td>データ3−3</td>
  </tr>
</table>
[ CSS ]
.table_5 td {
border: none;
color: #000;
}
.color-1 td {
background-color: #e0ffff;
}
.color-2 td {
background-color: #fff0f5;
}
/* レスポンシブ対応 */
@media screen and (max-width: 768px) {
.table_5 td {
display: block;
text-align: center;
}
}

<tr>タグにclass名をつけてbackground-colorを指定すると、列ごとに背景色を変えることができるよ!
次は、もっとカラフルにしてみよう!
| ◯◯◯ | ☆☆☆ | ◯◯◯ | ☆☆☆ |
| ☆☆☆ | ○◯◯ | ☆☆☆ | ○◯◯ |
| ◯◯◯ | ☆☆☆ | ◯◯◯ | ☆☆☆ |
[ HTML ]

<table class="table_6">
  <tr>
    <td class="color-3">◯◯◯</td>
    <td class="color-4">☆☆☆</td>
    <td class="color-3">◯◯◯</td>
    <td class="color-4">☆☆☆</td>
  </tr>
  <tr>
    <td class="color-4">☆☆☆</td>
    <td class="color-3">○◯◯</td>
    <td class="color-4">☆☆☆</td>
    <td class="color-3">○◯◯</td>
  </tr>
  <tr>
    <td class="color-3">◯◯◯</td>
    <td class="color-4">☆☆☆</td>
    <td class="color-3">◯◯◯</td>
    <td class="color-4">☆☆☆</td>
  </tr>
</table>
[ CSS ]
.table_6 td {
border: none;
color: #fff;
text-align: center;
}
.color-3 {
background-color: #ffb6c1;
}
.color-4 {
background-color: #87cefa;
}

<td>タグにclass名をつけてbackground-colorを指定すると、セルを一つずつ背景色を変更できるよ!
セルを結合したテーブルデザイン
| タイトル1 | タイトル2 | タイトル3 | |
|---|---|---|---|
| タイトル1 | データ1−1 | データ2−1 | |
| タイトル2 | データ1−2 | データ2−2 | データ3−3 |
| タイトル3 | データ1−3 | データ2−3 | データ3−3 |
 [ HTML ]

<table class="table_7">
  <tr>
    <th class="th-pc">タイトル1</th>
    <th class="th-pc">タイトル2</th>
    <th class="th-pc">タイトル3</th>
  </tr>
  <tr>
    <th class="th-sp">タイトル1</th>
    <td>データ1−1</td>
    <td colspan="2">データ2−1</td>
  </tr>
  <tr>
    <th class="th-sp">タイトル2</th>
    <td>データ1−2</td>
    <td>データ2−2</td>
    <td>データ3−3</td>
  </tr>
  <tr>
    <th class="th-sp">タイトル3</th>
    <td>データ1−3</td>
    <td>データ2−3</td>
    <td>データ3−3</td>
  </tr>
</table>
[ CSS ]
.table_7 th {
border: solid 1px #000;
background-color: #696969;
color: #fff;
}
.table_7 td {
border: solid 1px #000;
background-color: #ffffff;
color: #000;
text-align: center;
}
.th-sp {
display: none;
}
/* レスポンシブ対応 */
@media screen and (max-width: 768px) {
.th-pc {
display: none;
}
.th-sp {
display: block;
text-align: center;
}
.table_7 td {
display: block;
}
}
colspan=”数字” で結合するセル数を指定できるよ!
横に結合する時は “colspan” 縦に結合する時は “rowspan” を使ってね!
“テーブルデザイン” に便利なCSSまとめ
- padding: ◯px; → <td> / <th> の余白を指定
- border: 線の種類 太さ カラー; → 枠線を指定
※ 種類 solid…実線/ double…二重線/ dashed…波線 - background-color: #カラーナンバー; → 背景色を指定
- color: #カラーナンバー; → フォントカラーを指定
- width: ◯%; → 幅を指定
注:<table> を100%に指定し、その中で <th> / <td> を100%になるように振り分ける
“テーブルデザイン” に便利なHTMLまとめ
- table > tr > th(省略可)> td の順で使用する
- colspan → 横のセルを結合
- rowspan → 縦のセルを結合
- caption → テーブルの概要を記入できる
注:<table>タグのすぐ下に<caption>タグとして使用
“テーブルデザイン” に便利なジェネレーター
テーブルデザインを作成するのが大変!時間がない!もっと他の部分に時間をかけたい!そんな時に便利なのが、ジェネレーターです。
ジェネレーターは、ほしいセル数や枠線等を入力すると、簡単にCSSを作成してくれます。
ジェネレーターを使用して時短したり、どんなCSSを使うのか学習として利用したりしてみてください!
参照)Table Tag Generator:https://tabletag.net/ja/
参照)Tag index:https://www.tagindex.com/tool/table.html
まとめ
テーブルデザインは、Webサイトを作成する中でかかせないデザインの一つと言ってもいいくらい、たくさんの場面で使われています!
今回は、基本的なテーブルデザイン(表) の使い方をまとめてみました。
私は、表作成だけではなく横並びのデザインを作成する時に枠線をなくして使用するという使い方をすることもあります。
テーブルデザインに困ったときの参考にしていただけたら幸いです♫


